


 In the ongoing marathon of performing well in organic search it may feel like you've been running mile 20 for months without making any significant progress. You've ramped up your content efforts but can't seem to move up your search rank to the coveted #1 search position. What if you could further optimize your Google search listing to stand out from the clutter, even without holding the first position, by adding a headshot that personalizes your content in the search engine result page (SERP). Do I have your attention? Say hello to Google Authorship, also know as Rel=Author tags.
If the term "rel=author" has you scratching your head, wondering why you haven't heard of this before, don't fret. The number of online content creators that have yet to implement this SEO enhancement far outweigh those who are actually using it. Google introduced "rel=author" last summer as part of its Author Rank rollout, which was designed to legitimize real authors of great content and catch content pirates. In my personal opinion, I also see this as a way for Google to entice more users to create a Google+ page, which is required to benefit from this search enhancement. Since it's been proven that search content optimized with "rel=author'' receives a higher click-thru rate (CTR) when it's the only face visible in the search page, you shouldn't need any convincing whether to implement.
Now that you have some background on the concept lets breakdown the steps for implementation.
As stated above, you'll need a Google+ account to start the process of setting up your "rel=author" tag. If you've been holding out on creating account now's the time! It's pretty painless and you can start by visiting https://plus.google.com/ and signing in with your existing Google account or creating an account.
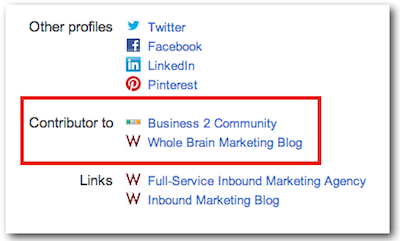
Once you've created your account you need to be sure to optimize your profile by listing your blog or website URL within the "Contributor to" section, as shown here.
Working from your personal Google+ profile URL, which you can copy & paste from your browser window while viewing your main profile, you'll need to assemble the following tag/code snippet to then paste into your blog/website (red text denotes areas you'll need to customize).
a href="https://plus.google.com/unique set of numbers from URL minus the '/posts' extension" rel="author" target="_blank">Connect with Your Name on Google+</a>
Using your "Rel=Author" tag that you assembled in Step 2, add this tag/code snippet to the page of content or blog post you would like it to appear to claim your authorship of the content. The tag snippet should be applied diretly within the HTML editor for the page, towards the bottom of the page of content. An alternative to having the tag embedded in a text link as outlined in Step 2, is to have the link embedded in your bio photo/headshot on the page of content where you're applying the tag.
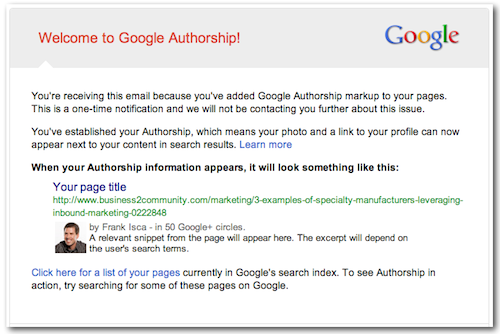
This is a good question and one that unfortunately depends on Google's search algorithm. Google has actually stated there's no guarantee on whether your authorship image will appear at all, but in most cases if you're following these steps and producing valuable content you'll be successful and can expect the update to appear anywhere between 2-3 weeks (if you're lucky) or possibly up to 3 months. From my own experience it took roughly 2 weeks to appear in the SEPRs on the content I applied the tag to. When it does happen you'll want to do a happy dance in your chair. I did at least! You can also expect to recieve a confirmation email such as this, which is Google's way to say "You're In!"
The concept of "rel=author" all goes back to Google's mission to highlight and enhance the greatest, most helpful content on the web. If you need some help to focus your content efforts, check out our collection of Inbound Marketing Content Creation Templates.