Websites need regular updating and fresh content, yet there comes a time when your site just needs a makeover. There’s no right or wrong answer for how often you should redesign your site, but most marketers suggest every couple years (according to a survey by HubSpot).
That may sound daunting (and expensive), but that’s why it’s best to take a growth-driven design approach (GDD) — an iterative website redesign process. Here at Weidert, we recently noticed some signs that our existing website needed a refresh. We shifted our branding a bit, wanted to update our overall site speed, and needed to clean up the backend for efficiency, but we were still able to build on the strong foundation we established a few years ago rather than start from scratch — the basic premise of GDD.
Perhaps your company has new branding, shifted its services, or found a new niche market or target audience. Or, maybe you need to update code or remove bloat from your website to improve performance.
Completing a website redesign project is now easier than ever with available CMS tools and technologies, but it’s vitally important to make sure you complete this 10-step website checklist before and after you launch to ensure a positive user experience:
Pre-launch Website Checklist
1. Proof and check design standards, formatting, and page data
2. Check every link and button on your site
3. Conduct cross-browser testing and device responsiveness
4. Confirm privacy policy and cookie compliance for GDPR and CCPA
Post-launch Website Checklist
5. Update your CMS templates for dynamic content
6. Take down outdated pages
7. Setup 301 URL redirects
8. Crawl the site for errors and issues
9. Submit an XML sitemap to Google for crawl
10. Monitor Google search console for errors
1. Proof and Check Page Design Standards, Formatting, and Page Data
Sounds obvious, but be sure to carefully look over the design and layout of each and every page on your website. Is all of your text formatted in the same way? Do your secondary and tertiary page headers match what's reflected on your main navigation and/or dropdown menus? These are little things that could change or evolve throughout the redesign process.
Something as simple as changing a header requires making sure that change is reflected in multiple places, including menu navigations/drop-downs, interior pages, landing pages, and so on. Your home page should have a different feel than your interior pages, but they should all be cohesive and tell the same story throughout.
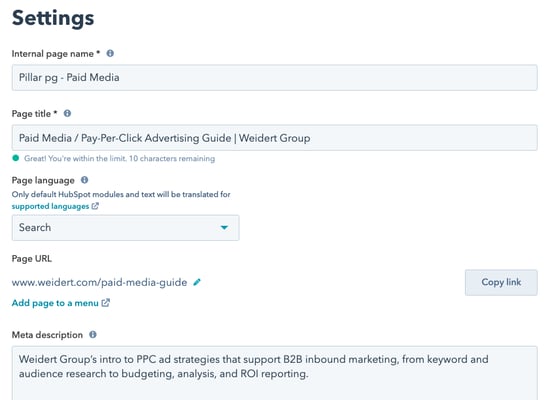
Double check that all searchable data components, such as page titles, meta descriptions, title tags, URLs, and image alt tags are set up. And it’s a given that your site has an SSL certificate. Not only will these steps help with search engine optimization (SEO), but they also give your site a polished, complete look throughout. This is especially important to keep in mind if you’ve cloned any of your site pages, as you’ll have to remember to at least give your cloned pages their own relevant URLs.
And, for the love of all that’s inbound, proof your website content with a fine-toothed comb. Nothing will turn your prospective customers off more than a poorly proofed website that misspells your competitive advantage.
2. Check Every Link and Button on Your Site
This may seem like a simple enough task, but it’s easy to overlook some links. Don’t just test the links in your menu navigation and the body copy throughout your site; check every single link on your site to make sure each is working correctly. Don’t forget to check any links you may have in your footer, as well as the links or calls-to-action that were included in your old blog posts. Are they relative links, when appropriate? Do they open in a new window, if needed?
There are a lot of tools to check on-page links, but it’s important to note that they won’t check whether the link is wrong, only whether it’s a 404 error page (because you don’t necessarily need to fix links that are properly redirected, and the tool can’t tell if it’s linking to the intended page — only a page that no longer exists). Linking is the underbelly of user experience, so make sure you’ve done everything intentionally.
3. Conduct Cross-browser Testing and Device Responsiveness
You can use a service like BrowserStack, HubSpot tools, or the Chrome Inspector tool to see what your website will look like on different browser types. Just because it looks right to you on Chrome doesn’t mean it’ll translate well on Firefox, Edge, Safari, or others.
It’s also critical to optimize your site for mobile — both handheld and tablet — to maximize the user experience (UX) and SERP. About half of the world’s internet users use mobile devices, and that number continues to grow, so take a mobile-first approach. Note that the way your pages resize for mobile may affect the sizes of your headers or banner images. Also, consider font sizing and touch elements like buttons or menus being too close to one another.
Pro tip: Even if you’ve seen your website on a particular browser, you’ll still want to check out what it’ll look like on older (or newer) versions of that same browser.
4. Confirm Privacy Policy and Cookie Compliance for GDPR and CCPA
Depending on how long it’s been since you’ve redone your website, you may not be completely up to date with GDPR and CCPA regulations. These rules involve privacy policies and how you use cookies on your website. Businesses need to have “clear and conspicuous” information about their privacy policies on their home page. Make sure you’re compliant by having a privacy policy page and updating your cookie and form settings.
5. Update Your CMS Templates for Dynamic Content
Content that is created dynamically can’t be changed until after launch. For example, if you want existing customers or qualified leads to have a different experience when accessing gated content, you could have them forgo filling out a form. Or, if someone already subscribed to your blog, you don’t need to keep showing them the subscribe CTA.
Subscription pop-ups, blogs and error pages are just a few examples of dynamic content. In HubSpot, these templates have to be specifically chosen in the HubSpot CMS Hub settings to make sure they point to the new template designs. This is very often overlooked.
6. Take Down Outdated Pages
Removing pages that are outdated is one of the most commonly missed steps when launching a new website. Let’s say your current website has a URL for your Contact Us page with a /contact extension. However, you updated your new website to have an extension of /contact-us. The old page won’t just disappear and still exists with the old look and style and can be found on Google by your prospects. So, it’s important to pull those down and redirect the url to the new ones.
Which leads us to...
7. Set Up 301 URL Redirects
Avoid broken links by making sure you have the appropriate redirects to your new website set up. If any of your existing page URLs are changing, no matter how slight, you should have 301 redirects in place to redirect visitors to your new URL. If you’re a HubSpot user, 301 URL Redirects are built directly into HubSpot. You can also use services like EasyRedir or HubSpot (feature in beta) for forwarding apex domains.
8. Crawl the Site for Errors and Issues
A website may act differently in staging than it does once it goes live on a server, and there may be glitches or errors that could go undetected. Tools like SEMrush or Screaming Frog can help you check for 404 errors, missing meta descriptions, duplicate titles, redirects, broken links, and more.
9. Submit an XML Sitemap to Google for Crawl
Be sure to have Google crawl your new site using Google Search Console to help ensure your new URLs appear in the search engine’s results. This should be done immediately after launch and previous steps are performed, since it’s inviting Google to explore and index your new website on the search engine results page in place of your old website pages.
10. Monitor Google Search Console for Errors
Google Search Console helps you monitor, maintain, and troubleshoot your site’s presence in Google search results. Google will automatically email you about indexing errors, spam, or other issues. Pay attention to these alerts since they could reveal critical issues you didn’t catch post launch. The service has several other features you can take advantage of, so be sure to leverage this free tool.
Your website is a powerful marketing tool. You may be tempted to cut some corners in the interest of going live with your new website design more quickly, but taking the time to check each aspect as listed above will help give your visitors the positive experience they’re looking for when they come to your website.
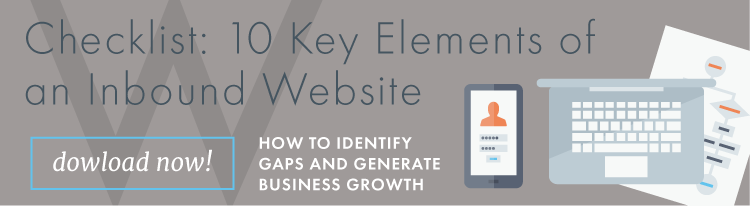
There’s much to consider than what can be covered in a single article, so be sure to access our more in-depth resource, Elements of Inbound Website Checklist, highlighting additional steps you’ll need to take when planning and building a website that helps your company grow.

You May Also Like...

Video
How to Execute a B2B YouTube Strategy That Compounds

Lead Generation
Loop Marketing Express Stage: Build an AI-Ready Marketing Foundation